Lowers

Super Moderator
Joined
Oct 23, 2011
Posts
647
Likes
1
answer: Full Android instructions inside

How to Un-Root/Restore Stock ROM - HTC Handsets


HTC phones are really easy to unroot, because HTC provide a program called an ‘RUU’ that allows you just run the app and unroot (restore a stock rom) in a few clicks.

Download the appropriate RUU from shipped-roms.com. You will have to use the codename for your device, e.g.:

Original Desire = Bravo

CDMA Desire = Bravo_C

Wildfire = Buzz

Nexus One = Passion

If you’re not sure then just use a search engine to find it out.

You can either get the latest carrier branded version, or use one with ‘WWE’ in the name for a generic, World-Wide English build.

Once the RUU has downloaded, make sure HTC Sync is installed so you will have the correct drivers for the RUU to communicate with the phone.

Double click on the RUU file, click the button to view the readme which has some troubleshooting information in in case something goes wrong.

Follow the instructions in the RUU app to complete the unroot process, make sure that you do not unplug your phone until it says that it is safe to do so.

1307712309.png


Troubleshooting

Error: Custom ID Error - You need to create a goldcard then rerun the RUU.
 

Lowers

Super Moderator
Joined
Oct 23, 2011
Posts
647
Likes
1
answer: Full Android instructions inside

How To Create a Goldcard


I. Before You Begin

1. Some memory cards simply will not let you edit them in the way we are about to, so you may need to do this procedure and if it doesn’t work, try a new memory card. 2GB Kingston SD card DOES work for sure so up to you if you want to just buy one of those before beginning.
2. YOU WILL NEED AN SD ADAPTER! This can be a MicroSD to USB that allows you to plug the SD card into your computer’s USB port OR a MicroSD to SD adapter if you have a SD port on your computer.
II. Setup ADB

1. Follow these instructions (with video) to setup ADB for your phone, then come back to this procedure to continue.
How To Setup ADB
III. Create a Goldcard

1. Put the memory card you want to use for the GoldCard into your phone.
2. With the memory card in your phone, click on Settings, SD and Phone storage, then click Unmount SD card. Once it unmounts, click Format SD card. (Please keep in mind that some memory cards don’t work, and this will erase all data on your SD Card so back all the data up first to your computer)
3. On the Phone, goto Settings, Applications, Development and then make sure USB Debugging is checked.
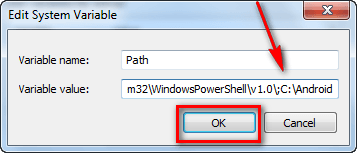
4. *Make sure you have installed the SDK and Fastboot correctly from Section I!!!
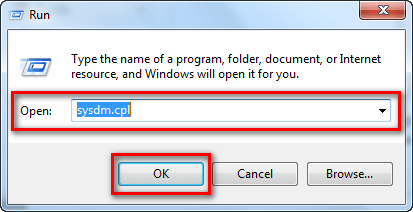
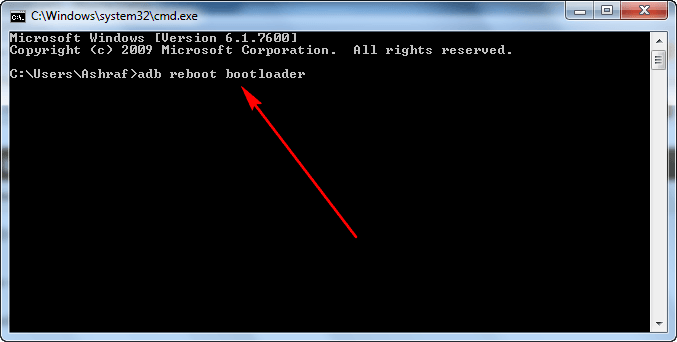
Plug the phone into the computer and then open the Command Prompt (goto the start menu and type in cmd in the search box). Then type the following with hitting enter at the end of each line.
cd\
cd\AndroidSDK\tools\
adb devices
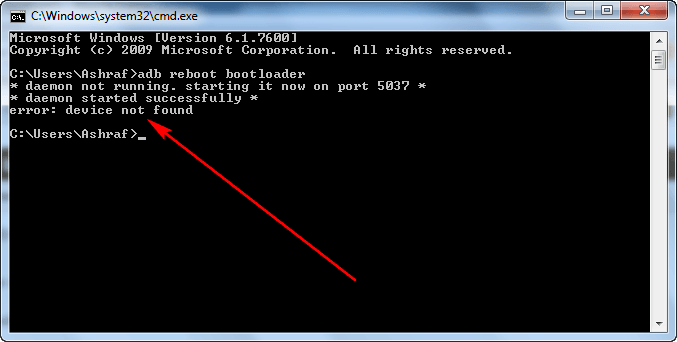
(wait for it to show a serial number underneath, if it doesn’t then reinstall the driversfrom section I).
Then type:
adb shell
cat /sys/class/mmc_host/mmc1/mmc1:*/cid (There is no spaces in this line EXCEPT right after the word cat in the beginning, make sure to put that space in)
5. A code will display, write the code down (MAKE SURE TO WRITE IT DOWN EXACTLY!)
6. Now with the code written down, simply write it backwards (it must be reversed, so if the code is 123456789, slowly write it backwards and make sure not to make a mistake so it becomes 987654321 then continue to the next step).
7. Now, on your computer, goto Free HTC goldcard generator | RevSkills and enter your email in the appropriate field and for CID enter the reversed CID you just copied down BUT REPLACE THE FIRST 2 DIGITS WITH 2 ZEROS! (i.e. 12345678910 becomes 00345678910). *Thanks to Viper for providing these Goldcards for FREE!
8. Click continue and then you will receive your goldcard.img via email. Once it arrives save it to your computer.
9. Now, goto HxD Hex Editor - CNET Download.com to download the HxD Hex Editor. Save it and install it to your computer.
10. Take your SD card out of your phone and put it into the SD adapter it came with. Then put that into your computer so it shows up on your computer as Removable Disk.
11. Open the Hex Editor (Run as Administrator if one Vista or Windows 7) and click on the Extra tab, then click on Open Disk. Under Physical Disk select Removable Disk (your SD card you just put into the computer). Make sure to UNcheck “Open as ReadOnly”. Click OK.
12. Goto the Extra tab again and click Open Disk Image. Open up the goldcard.img that you saved from your email. You should now have two tabs, one is the SD card (Removable Disk) and the other is the goldcard.img
Press OK when prompted for Sector Size 512 (Hard Disks/Floppy Disks).
13. Click on the Goldcard.img tab and click on the Edit tab and click Select All. Then click on the Edit tab again and click Copy.
14. Click on the Removable Disk tab (Your SD Card) and select offset 00000000 to 00000170 then click on the Edit tab and click Paste Write.
15. Click on File then click Save.
16. Close the Hex Editor.
17. Test what we’ve done:
Take out the memory card from the computer, then put it back in.
Try to open the memory card on the computer (Removable Disk), if it lets you, you are all set. If it asks/tells you to reformat the card, then try steps 13 – 19 again. If it gives you the same error again, then try a different memory card (Erlern said it didn’t work for him until he finally went and bought a Kingston 2GB card, then it worked on that card).
18. You can now use this goldcard to root phones that were previously unrootable!
Reported Issues:
Issue: I get no such directory or file when I type:
cat /sys/class/mmc_host/mmc1/mmc1:*/cid
Solution: Try to type this instead (replace the 1′s after mmc with zeros):
cat /sys/class/mmc_host/mmc0/mmc0:*/cid
Issue: Having difficulty with the cat command…
Solution:
“Plug your phone into your computer with the going to be gold card
Go to my computer
Make sure you mount your phone to your computer
Right click after mounted FORMAT on your drive NOT IN THE SETTINGS>FORMAT MODE (trust me)
dont do quick format let it run its course
After it has completed formatting come back to the steps starting at step number 4.”
 

Lowers

Super Moderator
Joined
Oct 23, 2011
Posts
647
Likes
1
answer: Full Android instructions inside

Recovery

The recovery partition is a boot-mode for your phone that allows you to wipe your settings from the Data partition of the phone (a hard wipe), or perform an update using an update.zip file on the root of the microSD card. It is common (although not necessary) to flash a patched Recovery image, such as Amon RA's one. This allows you to run Nandroid backup from the device, and flash modifications, such as [[#update.zip]] files to the device, essentially becoming a means to install sotware to the device. Recovery mode is separate from 'normal' mode, and can be entered by holding down home whilst turning the phone on.

1307712309.png


update.zip

An update.zip (does not have to actually be called update.zip if you have a patched Recovery image) is a file containing some files which will be copied to the phone's internal memory. Normally, a new system update or ROM is stored in the file, but update.zip files are commonly used to install modifications such as themes or applications that are installed on the System partition to prevent uninstallation.

To flash one of these files, which commonly would contain a custom ROM for your phone, you would boot your phone to a patched recovery image (whether using Fastboot, or the home+power method if you have a patched Recovery image flashed on your phone)

Update.zip files are cryptographically signed, and more information on how to sign your own files can be found online.

1307712309.png


WWE

Stands for World Wide English version of the ROM. There can be local versions of ROMs too. For example VR10 is based on the Taiwan version, VR12 on the WWE one. Interestingly, WWE excludes the English (US) locale.
 

Lowers

Super Moderator
Joined
Oct 23, 2011
Posts
647
Likes
1
answer: Full Android instructions inside

Basic Linux/Unix Shell Commands - Android


NOTE = All commands in linux/unix are CASE SENSITIVE.

1307712309.png


cd - Change Directory

To change to any directory, simply type:

cd dirname
dir name is the path. For instance, to switch to system/etc, type:


cd /system/etc
'..' will allow you to go back one directory. In our example, typing:


cd ..
would take you back to /system


1307712309.png


ls - List Files

To list all the files in whatever directory you're in, simply type:

ls
pressing enter after, of course. This will list all NON-HIDDEN files/directories.


ls /system/etc
will list the contents of system/etc


ls -l
will list all NON-HIDDEN files in your current directory with additional details


ls -a
will list all files/directories(including hidden) within your current directory


1307712309.png


su - SuperUser

The standard adb shell (unless you're on an insecure kernel/ramdisk), will be a non-root shell ($)

To obtain root priviliges (if your phone is rooted), simply type:

su
on obtaining superuser priviliges, you will be presented with a # symbol, which represent a root shell.


1307712309.png


chmod - Change Mode

The two most commonly used 'modes' you'll come across in Android are '777' and '755'

These numerical pemissions have different meanings, of course. This can be a little confusing, so I hope this explains it in a simple to understand way.

As you can see, there are three numbers in the following example; 'chmod 755'

So, to break that down: The first number in the sequence, '7', represents the USER (aka, you). The second number in the sequence, '5', represents the GROUP (users who are members of the file's group) and the third number, '5' represents OTHERS (aka, everyone else).

Now to explain why they are 755, and the significance of those numbers, see the following list:

7 Full
6 Read/Write
5 Read/Execute
4 Read Only
3 Write/Execute
2 Write Only
1 Execute
0 None


So in the instance of 777, you can see that USER, GROUP and OTHERS have FULL access to the file in question.

To change the permissions of one file (apns-conf.xml for example, type:
chmod 777 /system/etc/apns-conf.xml


To change the permissions of all files in a directory, use the -R (recursive)option:
chmod 777 -R /system/etc


1307712309.png


pwd - Print Working Directory

Couldn't be more simple. if you want to find out which dirctory you're currently in, type:

pwd
and press enter.


1307712309.png


cat - Concatenate (evolved from)

The cat command if used to list a file's contents on your screen; or pass via pipeline to use with other Linux commands.

cat /proc/mounts
will output the various mount points in your android OS.


Note that there are many other uses for the cat command. It can be used to copy files, for example.

1307712309.png


dd - Data Dump

This one's useful if you're ever looking to dump your ROM/kernel, etc. After you have run cat /proc/mounts (above) and have a su (#) shell, you can dump system in the format of its current file system to your SD card. Let' say system is on mmcblk0p1 (/dev/block/mmcblk0p1). Type the following:

dd if=/dev/block/mmcblk0p1 of=/sdcard/system.img bs=4096

There you go - system.img is now on your SD card!


1307712309.png

mount - As it says on the tin.

In order to mount system as read write, (using the output from cat /proc/mounts), simply type in the following:

su
mount -o rw,remount /dev/block/mmcblk0p1 /system


Note - you will see many variations of this. Just keep it simple like the command above. You don't need to specify the file system type, for example.
 

Lowers

Super Moderator
Joined
Oct 23, 2011
Posts
647
Likes
1
answer: Full Android instructions inside

Install ADB and Fastboot on your Windows computer for use with your Android phone


Installing ADB and Fastboot

Installing ADB and Fastboot is actually very easy:
The following guide is for Windows PCs only, but ADB/Fastboot can be installed on Linux and Mac OS X also. (You just do it differently for Linux/Mac OS X.) Also note that this guide was written on a Windows 7 computer. However, the guide will work on Windows XP/Vista the same way; I don't know about earlier versions of Windows.

  • Download(34 MB) ADB, Fastboot, and other tools.
    • Note: The tools found in the download are provided by Google, found in Android SDK. I have simply extracted the tools and uploaded them for easy access, instead of telling everyone to download the whole SDK. You can get the same tools if you download the Android SDK directly from Google.
  • Extract the contents directly into your C:\ partition. You should now have a folder C:\Android that looks something like this:


  • Press Win + R on your keyboard to bring up the Run dialog.
  • Once the Run box is open, type in sysdm.cpl and hit OK:


  • Once you hit OK, the System Properties panel should open; click on the Advanced tab:


  • From the Advanced tab click on Environment Variables:


  • At the Environment Variables window find where it says Path under System variables, click on it, and click the Edit button:


  • When the Edit System Variable window pops up, type in ;C:\Android at the very end and hit OK:
Make sure you type in exactly ;C:\Android (be sure to include the semi-colon at the beginning).
  • After clicking OK, close out all windows. You are done!
Using ADB and Fastboot

Once you have them installed, using ADB or Fastboot is as easy as opening command prompt, typing in adb xxx or fastboot xxx (with xxx being the command you want to run)...

...and hitting Enter on your keyboard to execute the command.
Take note, however, installing ADB and Fastboot is not enough to start using it with your phones. You need to install the relevant drivers on your computer - so your PC recognizes your phone - before ADB or Fastboot will be able to work with it. If you don't have any drivers installed, you will get an error similar to the following:

Drivers can typically be found directly from your phone manufacturer's website, unless you have a "Google Experience" phone in which case you may have to do a little bit of digging to find the relevant drivers. In the future I may write an article listing out where to find the relevant drivers for all Android phones, so look for that.
Uninstalling ADB and Fastboot

Uninstalling ADB, Fastboot, and the other tools is as easy and undoing what you did when you installed. In other words, delete C:\Android and all the files in it and remove the environmental variable you added earlier.
 

Lowers

Super Moderator
Joined
Oct 23, 2011
Posts
647
Likes
1
answer: Full Android instructions inside

Apktool - What it is and how to use it (Windows)


apktool.png


The Apktool is probably my best friend in the Android development world. Its purpose is very simple, it decodes an APK file back to its original form, then rebuilds it after modifcations have been made to smali code or XMLs.

As taken from the google source code web site (brut.alll): "It is NOT intended for piracy and other non-legal uses. It could be used for localizing, adding some features or support for custom platforms and other GOOD purposes. Just try to be fair with authors of an app, that you use and probably like."

Some good uses of apktool are things like changing or removing options from the settings menu, etc, but it really can enable you to do almost anything to the OS, with the creativity and knowledge.


How to use it!

Before you begin, it's a good idea to have the following installed and set up: JDK & JRE from HERE


Decompiling with APKTOOL - step by step:


1. You can either visit the google code site for apktool and read through their instructions, or use our pre-packaged APKTOOL.rar available here.

2. Extract the contents to a file you will remember, as you will be working from there in command prompt! I'd recommend putting it with your platform-tools if you haven't added them to your path, as this will make editing recently pulled applications easier.

3. Now, if the apk you want to edit is on your phone, use adb to pull it. If you're unsure of how to do this, go back to our beginner guides and read up on adb and the SDK.

4. Pull framework-res.apk from the phone, as some applications will require this to be decoded.

5. Once framework-res.apk has been pulled, type the following command:

apktool if framework-res.apk

To break that down, you're telling apktool to if (install framework) and then specifying the apk. You should see the following output:

I: Framework installed to C:\whatever\your\path\is\framework\1.apk

Now it's time to decompile the APK.

6. Type the following:

apktool d Settings.apk Settings

Of course, replace Settings.apk with the name of the application you want to decompile. To give you more of an explanation, you're telling apktool to d(decompile/decode) Settings.apk, and put the output in a folder called Settings. The folder part, Settings isn't necessary, I just included it so you could see that it was an option.

You should then see the following outputs if its working:

I: Loading resource table...
I: Decoding resources...
I: Copying assets and libs...


Voila... your decompiled application will now be sat in the folder you specified above (we specified Settings).


Rebuilding the APK after making modifications - step by step

1. Simply type the following command:

apktool b Settings Settings-new.apk

To break that down, you're telling apktool to b (build) the contents of the Settings folder into an apk called Settings-new.apk

You should see output similar to this:

I: Checking whether sources has changed…

I: Smaling…

I: Checking whether resources has changed…

I: Building resources…

I: Building apk file…

2. Once done, you will NOT be using the apk file you have just created. The reason being, for one it's not signed. Two... it often causes me problems. Instead, you need to open both the original Settings.apk and Settings-new.apk in 7-zip, and copy over the files you have changed from the NEW one to the ORIGINAL. If you have modified /res/values/*.xml, it's likely that these have been compiled into a file called resources.arsc. If that is the case, copy resources.arsc only.

3. That's it! Add the new file to your ROM or push it back to the phone!
 

Lowers

Super Moderator
Joined
Oct 23, 2011
Posts
647
Likes
1
answer: Full Android instructions inside

Flashing with Heimdall


1320676623.jpg


Some of you may have heard of Heimdall, and wondered 'wtf is it?'

Well, simply put; it's a better, cross-platform alternative to ODIN. What's more, it's totally open source and runs on Qt for its GUI and uses libusb to communicate over USB. In summary, it means you're not limited to ODIN+Windows any more.

This guide will explain the basics of flashing with Heimdall.

Flashing with Heimdall is a little bit different than with Odin. With Odin you usually select a PIT, if necessary, add the PDA.tar.md5, Modem.tar.md5 and CSC.tar.md5 to the locations, put the phone in download mode and hit go. Heimdall takes a different approach. In the Heimdall GUI you need to select all components you want to flash. This means extracting the TAR-archives and pointing Heimdall to their respective files. This allow relative fine-grained control over what you flash and doesn't depend on files being named correctly.


Installing Heimdall

Simply head to this website: Heimdall – Glass Echidna and download it.


Manually flashing with Heimdall

I'm not going to explain how to use the GUI, as it's straightforward in every sense. Instead, I'll explain how to MANUALLY flash with heimdall via command line.

This really couldn't be simpler. Assuming you have heimdall in your path (if not, just cd to the heimdall directory and place files there), and place the extracted contents of the tar.md5 in a folder and cd to it.

Let's say you want to flash system, and system only. First of all, you'll have to boot into download mode. Depending on the Samsung device, there will be a button combination to do so. The simplest way however, is 'adb reboot download' from your computer with the device on and usb debugging enabled.

With the phone now in download mode, you're ready to flash. So... as mentioned previously, in this example we're flashing System, and system only. I'm going to use the Galaxy SII as an example. Connect your phone to the computer and type:

heimdall flash --factoryfs factoryfs.img

Then press ENTER. Heimdall will flash the system image and reboot the device.

Now, let's say you want to flash system, and kernel. Simply type:

heimdall flash --kernel zImage --factoryfs factoryfs.img

Really, it couldn't be simpler! For a guide on how to use Heimdall's GUI, visit : [GUIDE] Flashing with Heimdall - xda-developers

A huge thanks to the creator: Benjamin Dobell, and the source for this guide : daenney (XDA)
 

Lowers

Super Moderator
Joined
Oct 23, 2011
Posts
647
Likes
1
answer: Full Android instructions inside

How to SIM (network) Unlock the Samsung Galaxy ACE/GIO/MINI


samsung-galaxy-ace-mini-gio.jpg


This method is extremely simple, and has worked every time for me on all three demo phones I received.

Pre-requisities

- You will either need the sdk set up for ADB access, or alternatively, an application on your phone which will install third party applications.

- You will need to have obtained ROOT access. Please see the guide on our forum to do so.

Method

1. Download the unlock code extractor app from here

2. Install it via adb (adb install nameofapp.apk) or by copying the file to your SDcard and installing with Astro (or alternative app).

3. Once the app is installed, you will first need to check

4. On the phone, dial *#7465625# to check which locks are running.

5. Run the application you have just installed; ensuring that you wait 60 seconds for it to work. It will generate a few unlock codes. Ignore any 0000000 and write the others down. Typically, there will be 1 or 2 at the most.

6. Turn off the phone, put in an unsupported SIM card and turn it back on.

7. When the phone boots, it will ask you for your sim unlock code. Type in one of the codes obtained from the app. If it doesn't work, use the other one

NOTE - DO NOT TRY ANY CODE MORE THAN ONCE. BE CAREFUL WHEN TYPING!

8. One of the codes will have worked...

Congratulations, you just unlocked your Galaxy Ace/Mino/Gio!
 

Lowers

Super Moderator
Joined
Oct 23, 2011
Posts
647
Likes
1
answer: Full Android instructions inside

Installing Cygwin on Windows for use in Android Development

Cygwin is a Windows program which allows you to use some (traditionally linux-based) GNU development tools, these are used in quite a few Android-related scripts that can be found around the Internet, you can use scripts created for Cygwin to do some key Android tasks, or if you are more advanced you may be able to convert some Linux scripts you find for use in your Windows/Cygwin environment. So, let’s get started!

Grab the Cygwin setup.exe from here and run it

Choose next to begin the install process, then from the second screen choose "Install from Internet"

1321441432.png


From the next screen, choose your install directory (or leave it as c:\cygwin), and unless you have a good reason, you may as well leave it set to install for all users.


1321441440.png


From the next two screens, choose the location of the local package dir (where cygwin will put the downloaded installation files) and choose your Internet connection type (usually direct connection).

Now choose one of the Cygwin mirrors (select any mirror really...), and clock next, then clock OK on the setup alert message.

On the next screen there will be a selection at the top of the list showing: "All: Default" - While you CAN click on "Default" once and it will change to "Install" for every package in the list, this will take a VERY long time to download and install every package, if you know which packages you need, you can manually select the ones you want to speed up the install process (for example, most scripts, including the boot.img extract/repack script you can get from the accompanying FYA guide requires a package called "perl" and it's dependencies everything else can be left as default) . Once you have selected the packages you wish to install (don't panic, you can add more later), click next.

1321441447.png


On the dependencies screen, leave all options as they are and click next.


Cygwin will now download the packages you have selected (this can take quite a while if you chose them all) and install them to your selected location.

1321441457.png


Done! Cygwin is now installed, you can launch the Cygwin bash shell from either the start menu or desktop shortcuts (if you chose to create them), the program will create it's profile from the skeleton files on first run, and you will be presented with the screen as shown below, which looks very similar to a typical Windows shell cmd window (or "DOS box"), from here you can execute any scripts or commands you have been given in other guides.

1321441464.png


Any suggestions, changes or mistakes, please enter them in the comments and I will be sure to update the guide accordingly!
 

Lowers

Super Moderator
Joined
Oct 23, 2011
Posts
647
Likes
1
answer: Full Android instructions inside

How to Unpack and Repack an nb0 File


130px-Java_logo.svg.png


Some manufacturers pack their ROMs into an nb0 file, which consists of a number of partitions in img format. In order to get to these img files, we first need to learn how to unpack an nb0 file, then, of course, how to repack the nb0.


You will need:

The Java Runtime Environment (if you're developing, you should have this and JDK anyway)

A688 Tools - Download them here


Method to Unpack nb0 files

1. Extract A688 tools to a memorable location

( NOTE - nb0-utils.jar will be referred to - you can find it in your A688_Tools folder, in the subdirectory /RomUnpackTools_Win)

2. Place the nb0 file in /A688_Tools/RomUnpackTools_win

3. Open a command prompt, and CD (change directory) to the A688_Tools/RomUnpackTools_win directory

4. Use the following command to unpack the NB0 file which you want to unpack:

java -jar nb0-utils.jar unpack file-to-unpack.nb0 folder-to-unpack-to

Of course, rename the file to unpack and folder to unpack to sections to suit.

If you get following message, you need add "-Xmx512M" in your command:

Exception in thread "main" java.lang.OutOfMemoryError: Java heap space

java -Xmx512M -jar nb0-utils.jar unpack file-to-unpack.nb0 folder-to-unpack-to


To edit the extracted contents, see our guide on loop mounting img files.


Method to Re-pack nb0 files

1. Open a command prompt, and CD to the A688_Tools/RomUnpackTools_win directory

2. Use the following command to repack target directory into a NB0 file.

java -jar nb0-utils.jar pack name-of-output-file.nb0 folder-to-pack-from

Of course, rename the name-of-output-file and folder-to-pack-from to suit.
 

Lowers

Super Moderator
Joined
Oct 23, 2011
Posts
647
Likes
1
answer: Full Android instructions inside

Theming Tools


Tools

To theme your Android ROM, you will need a variety of tools to cover most of the modifications, and optimsations.

Graphics Software

To begin, you will need a graphics editor to be modify all the graphical resources. There are very good ones out there. Here’s a few:

-GIMP (Free)
-Adobe Photoshop (Paid)
-PaintShop Pro (Paid)


You should try and get one that can handle indexed .png files, transparency layers, and has the ability to change hues and saturations. This will allow you to very easily change the colour of icons, while keeping shades and detail (unlike the Fill tool).

When saving any .png, make sure it only has a single layer.

Draw 9-patch

Draw 9-patch comes with the AndroidSDK, you will find it in the “/tools” directory. You will need this to make .9.pngs. I will explain how these work in more detail below. Basically it is a vector format that allows stretching without any distortion or blurryness, maintaining the same edges.

apktool

apktool allows you to dismantle .apk and .jar files into smali code and resources, allowing you to edit the decompiled .9.png’s along with bits of code that control variables such as colour of text in a certain area (e.g. notification bar). It will also allow you to build the smali code back into the .apk or .jar, and compile the decompiled .9.png files. You will need a command window or terminal for this.


Optipng

Optipng is a simple tool for optimising .png files in batches, making them smaller, and faster to load. You can simply just drag all the .png files you want optimised into the optipng.exe file, and it will automatically optimise them.

.zip browser

You will definitely need some sort of browser for .zip files. APK can be opened as a .zip archive. Doing so will allow you to edit the graphics without decoding and rebuilding. Windows XP and above have native support for .zip files, but you can also use programs such as 7zip and WinRAR.

ZipAlign

This is another tools that comes with AndroidSDK. It optimises the way the archive is packaged, allowing .apk files to run much more efficiently.
 

Lowers

Super Moderator
Joined
Oct 23, 2011
Posts
647
Likes
1
answer: Full Android instructions inside

Modifying Samsung Splash Screens (Galaxy S Series + SGS2)

Galaxy-S-Logo.png


How to Modify/Change the Samsung Splash Screens (FULL MANUAL METHOD!) - PART ONE

The following is a two-part guide (this is part one), which will teach you exactly how to modify the splash screen on ANY of the Galaxy S series devices (Captivate, Vibrant, SGS4G/Vibrant 4G, Fascinate, Exhibit 4G, Epic 4G, & SGS2)

Firstly, before I explain HOW to do this, you're going to need a bit of a background as to what exactly it is that you're going to be doing. The changes we're going to be making are two-fold, as the one splash-screen that you think you see, is actually two identical images, back-to-back.

Image 1
The first image is a simple jpg, located in a hidden directory in the root of your device.


Image 2
The second image is a specially formatted and modified image, that will require the use of certain tools, and the ability to build a kernel. If you're not comfortable with building a kernel from source, then I suggest you stick with Image 1. A guide on building kernels for Samsung devices can be located by searching our site.


Image 1 Guide - param.lfs


Pre-requisities

- The device must be ROOTED
- You must have a HEX editor installed on your computer (I recommend HxD - free)
- You must be capable of following simple instructions
- Familiarity with, and an installation of, ADB.


Method

- The first thing we're going to do, is pull an entire directory from your device. This step can be skipped if you already know the name of the jpg image which needs replacing on the device. Simply run the following in cmd/terminal (ensure that you change the directory format for Linux/Mac):


adb pull /mnt/.lfs c:\whatever

- Now, open up that folder on your computer, and look through the images until you find the one which you see on each boot. Make a note of it's name. Let's say, for argument's sake, that it's Logo.jpg.

- Open Logo.jpg in the photo-editor of your choice (Photoshop/Gimp) and create your new image. Do not alter the size (in pixels) of the image. It should remain 480x800.

- Once you've designed a splash screen you're happy with, save it to the same directory you have adb installed (platform-tools, most likely).

- Now, we're ready for the fun bit! In cmd prompt/terminal, type the following (ignore $ and # from the text below, this is just to indicate level of access):

adb shell
$ su
# dd if=/dev/block/stl6 of=/sdcard/param.lfs bs=4096


IF THAT DOESN'T WORK, use the following path:

# dd if=/dev/block/stl6 of=/mnt/sdcard/param.lfs bs=4096

- You have just dumped the param.lfs partition, which contains the images we want to edit. As it stands right now, this folder is read-only, and root access does not change that. So... we're going to modify it ourselves.

- Copy the newly acquired param.lfs file from the SDCard to your computer, leaving a backup on your SDCard.

- Open the file in HxD (or the HEX editor of your choice), and do a FIND (CTRL+F) on the full name of the image (Logo.jpg, for example).

You will find a result like this:

1315903365.jpg


- Simply change the highlighted hex values (highlighted in blue) to 00's. See the below image of how it should look:

1315903377.jpg

- FIND again, until you have done the same for EVERY reference to Logo.jpg. TAKE CARE NOT TO GO TOO FAR WITH 00's. Only change what is highlighted!


- Now save param.lfs, and prepare to flash it in DOWNLOAD MODE.

- Using Heimdall (much easier), type:

heimdall flash --param /location/of/param.lfs

ALTERNATIVELY:

Build into an ODIN flashable tar (see our guide on this website) and flash using ODIN.

- You will notice after flashing, that your splash screen image is a download-mode image. Don't worry about that. We will be sorting it next.

- When the phone boots back up, connect it to the computer, and flash the new logo like so:

adb push Logo.jpg /mnt/.lfs
adb reboot
 

Lowers

Super Moderator
Joined
Oct 23, 2011
Posts
647
Likes
1
answer: Full Android instructions inside

How to Change the Splash Screen on HTC Devices

MobileJaw-HTC-Logo_thumb.jpg


First you need to make sure you have an S-OFF/Eng HBOOT. This enables you to flash anything to your device, including custom Splash Screens.

This guide assumes you have some basic knowlege about how Android works and how to flash ROMs.

For CDMA HTC devices, see unrEVOked forever.

For the HTC Desire HD, see this thread.

For the HTC Desire Z/G2, make sure you have S-OFFed with gfree/visionary

For the HTC Desire, see AlphaRev.

For the HTC Hero, flash this zip.

For the HTC G1/Dream, flash this zip.

For the HTC Magic/MyTouch, flash this zip.


Droid Incredible

Download one of the splash screens from here, rename it to PB31IMG if it isn’t already, place it on the root of your SD Card (not in any folders), reboot into HBOOT (POWER + VOL DOWN) and press VOL UP to confirm install.


Evo 4G

Download one of the ‘Custom Splash Screens’ from this thread, rename it to PC36IMG if it isn’t already, place it on the root of your SD card (not in any folders), reboot into HBOOT (POWER + VOL DOWN) and press VOL UP to confirm the install.


Desire Z/G2

Look through this thread and download one of the PC05IMG.zip files, then place it on the root of your SD card (not in any folders), reboot into HBOOT (POWER + VOL DOWN) and press VOL UP to confirm the install.


Desire HD

Download this to get adb/fastboot and extract it to C:\adb. Download a splash screen from this thread. Also make sure that HTC Sync is installed for drivers.


  • On your phone, make sure USB debugging is on. (Settings > Applications > Development)
  • Open up a command prompt from Start > Run > cmd > run (Windows XP) or Start > Search for ‘cmd’ > hit enter
  • In the command prompt, type the following: (hitting enter after each line)
cd \

cd \adb

adb-windows reboot bootloader

fastboot-windows flash splash1 splash.rgb565 (or .nb)

fastboot-windows reboot

Enjoy your new Splash Screen!


Original Desire

Grab a splash screen from here and use this utility to flash it.


HTC Hero, Magic/MyTouch & G1/Dream

Download this to get adb/fastboot and extract it to C:\adb. Also make sure that HTC Sync is installed for drivers.

Step 1 – Creating an Image to Flash


  • Using Paint or any other highly advanced Image Editing Software, create an image to be your new splash screen.
  • Download the Splash Creator, unzip it and run ‘CreateG1Splash.exe’ (Don’t worry it’s for hero too)
  • Select the image and click ‘convert
  • In the same folder that the program is in, it should have made a file with .nb or .rgb565.
  • Rename this to splash (but keep the .nb or .rgb565!) and copy it to C:\adb
Step 2 – Flashing The Splash Screen


  • On your phone, make sure USB debugging is on. (Settings > Applications > Development)
  • Open up a command prompt from Start > Run > cmd > run (Windows XP) or Start > Search for ‘cmd > hit enter
  • In the command prompt, type the following: (hitting enter after each line)
cd \

cd \adb

adb-windows reboot bootloader

fastboot-windows flash splash1 splash.rgb565 (or .nb)

fastboot-windows reboot

Enjoy your new Splash Screen!
 
Top