digital_amit
Junior Member
- Joined
- Oct 31, 2011
- Posts
- 27
- Likes
- 0
TUTORIAL USE HWK SeDBx
My thread is dedicated to all users of HWK who doesn't have knowledge to operate this feature.
LESSON STARTS NOW :
SeDBx is one of the members in the family of HWK-UFS Sofware specifically designed to deal with newer SE units to compliment the unending list of supported models.
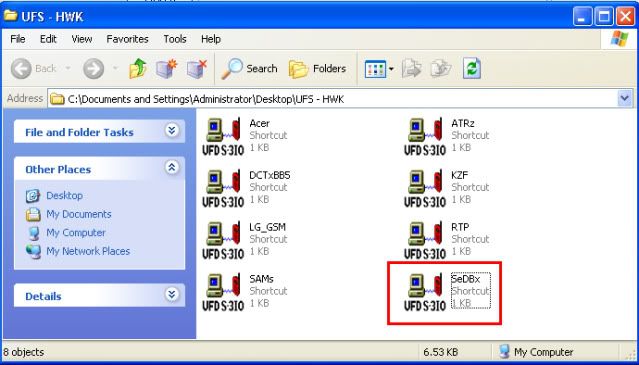
Here are the UFS Softwares that include SeDBx.

Next lesson is its interface.
Now, let us identify some of its major control.
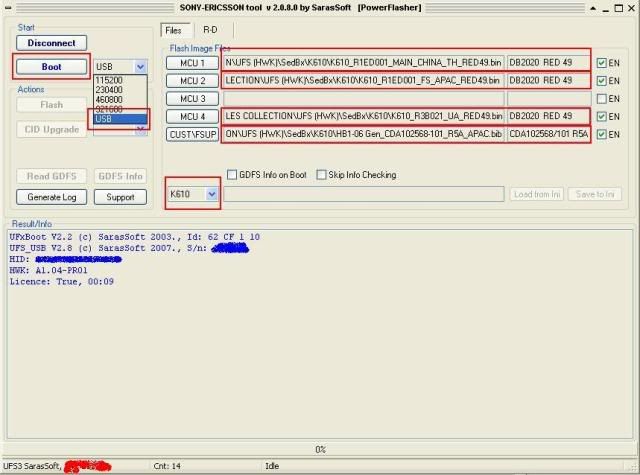
SeDBx INTERFACE:

First thing first, you have to put the phone into Flash Mode.
How ?
There are two options:
1. Via normal mode - using RJ45 cable.
2. Via USB mode - the usual DCU-60 cable.
I think there is no need for me to elaborate on the usage of these tools, you should use your common sense. (the sense which is not common
 ))
))
In the case of USB mode ... if ask for drivers, phone drivers can be found on the following location:
X:\Program Files\SarasSoft\UFS\UFS_DBX\USBFlashDriver
where X is the name of your Directory.
You can now press Boot and the phone will be attached in your assigned mode.
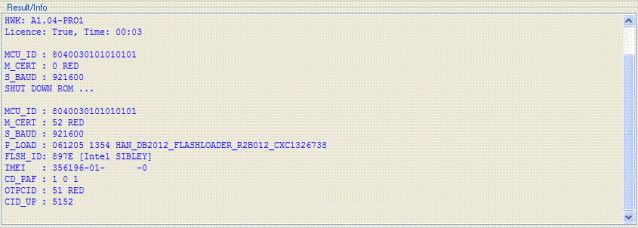
Successful Phone Boot displays Phone's Information on the Result Info Window ...

Next lesson is putting the correct files for specific model.
FILES USED FOR FLASHING:
The following is the correct setup for SE K610 model CID49. (sample lang yan ha
 ))
))
It will vary depending on the type of model your working with.

FLASH FILES DISTINGUISHED:
MCU 1 = Main Flash File (Largest MCU file in terms of size)
MCU 2 = File System (Larger MCU file in terms of size)
MCU 3 or 4 = Update Agent (UA) (Smallest MCU file in terms of size .... i.e. FOTA/EROM/CERT)
CUST\FSUP = This is a customization file.
In SETool .. it is equivalent to "Complete Phone". This file is needed or phone will encounter configuration error.
This file has two classifications namely BiB and BIC files
BIB - are files used to convert the phone from one market region to the other, example of this is changing language.
BIC - are files used if you only want to upgrade the phones software version.
MCU FILES doesn't follow that particular order ... but for simplicity purposes it should be wriiten that way.
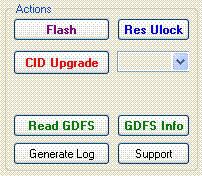
If you intend to flash the phone ... all you have to do BY NOW is to click the "FLASH" button.
Update Agent (UA file) is not a required image, you do not have to update this, unless you are changing the CID version, in this case UA Update IS REQUIRED)
OTHER ACTION BUTTONS:

CID Upgrade
The DROP-DOWN LIST BOX to the right will show the next CID up available for the connected phone, if the box is blank, you are on the latest supported CID, note this only works for DB2020/DB2012 phones at the moment and will only work with latest DB2020/DB2012 phones. Check that you have the firmware for the CID you want to upgrade too BEFORE upgrading the CID.
Res ULock (Reset Phone Unlock)
You should take note this is not network lock, but phone lock, only supports DB2020 at the moment, for others do "Read GDFS" info to display the code and then reset back to 0000 via the phones menu if required.
Other command buttons i think are self-explanatory.
(gamitin ulit ang common sense
 ))
))
OTHER OPTION BUTTONS:

GDFS Info on Boot
This option will display useful information such as CXC and CDA version, note this option does not work for all phones, W200 is one example of this.
Skip Info Checking
Is sometimes useful to boot phones which are damaged from profile error or other small corruption.
Load/Save from/to Ini
Once you have setup the required flash files, you can click "Save to Ini" and it will store the names for future use, note the Ini settings are read auto on phone boot, if the TAC does not exist, select the model manually and then click "Load from Ini".
DIGITAL -AMIT

My thread is dedicated to all users of HWK who doesn't have knowledge to operate this feature.
LESSON STARTS NOW :
SeDBx is one of the members in the family of HWK-UFS Sofware specifically designed to deal with newer SE units to compliment the unending list of supported models.
Here are the UFS Softwares that include SeDBx.

Next lesson is its interface.
Now, let us identify some of its major control.
SeDBx INTERFACE:

First thing first, you have to put the phone into Flash Mode.
How ?
There are two options:
1. Via normal mode - using RJ45 cable.
2. Via USB mode - the usual DCU-60 cable.
I think there is no need for me to elaborate on the usage of these tools, you should use your common sense. (the sense which is not common

In the case of USB mode ... if ask for drivers, phone drivers can be found on the following location:
X:\Program Files\SarasSoft\UFS\UFS_DBX\USBFlashDriver
where X is the name of your Directory.
You can now press Boot and the phone will be attached in your assigned mode.
Successful Phone Boot displays Phone's Information on the Result Info Window ...

Next lesson is putting the correct files for specific model.
FILES USED FOR FLASHING:
The following is the correct setup for SE K610 model CID49. (sample lang yan ha

It will vary depending on the type of model your working with.

FLASH FILES DISTINGUISHED:
MCU 1 = Main Flash File (Largest MCU file in terms of size)
MCU 2 = File System (Larger MCU file in terms of size)
MCU 3 or 4 = Update Agent (UA) (Smallest MCU file in terms of size .... i.e. FOTA/EROM/CERT)
CUST\FSUP = This is a customization file.
In SETool .. it is equivalent to "Complete Phone". This file is needed or phone will encounter configuration error.
This file has two classifications namely BiB and BIC files
BIB - are files used to convert the phone from one market region to the other, example of this is changing language.
BIC - are files used if you only want to upgrade the phones software version.
MCU FILES doesn't follow that particular order ... but for simplicity purposes it should be wriiten that way.
If you intend to flash the phone ... all you have to do BY NOW is to click the "FLASH" button.
Update Agent (UA file) is not a required image, you do not have to update this, unless you are changing the CID version, in this case UA Update IS REQUIRED)
OTHER ACTION BUTTONS:

CID Upgrade
The DROP-DOWN LIST BOX to the right will show the next CID up available for the connected phone, if the box is blank, you are on the latest supported CID, note this only works for DB2020/DB2012 phones at the moment and will only work with latest DB2020/DB2012 phones. Check that you have the firmware for the CID you want to upgrade too BEFORE upgrading the CID.
Res ULock (Reset Phone Unlock)
You should take note this is not network lock, but phone lock, only supports DB2020 at the moment, for others do "Read GDFS" info to display the code and then reset back to 0000 via the phones menu if required.
Other command buttons i think are self-explanatory.
(gamitin ulit ang common sense

OTHER OPTION BUTTONS:

GDFS Info on Boot
This option will display useful information such as CXC and CDA version, note this option does not work for all phones, W200 is one example of this.
Skip Info Checking
Is sometimes useful to boot phones which are damaged from profile error or other small corruption.
Load/Save from/to Ini
Once you have setup the required flash files, you can click "Save to Ini" and it will store the names for future use, note the Ini settings are read auto on phone boot, if the TAC does not exist, select the model manually and then click "Load from Ini".
DIGITAL -AMIT

